
Introduction
When I first introduced RPM Remote Print Manager® (RPM) back in 1995, the first beta testers were admin clerks at a major state university in the eastern US. It turned out that the beta release was just in time for student registration. When the admins were able to configure the output from the school’s registration system on their PC printers with just a few clicks, they told their bosses they wanted this software.
On previous registration days, the students were told to come back the next day and pick up a printout of their class schedule. Of course, if mistakes were discovered then, the whole process is thrown back a few days; I remember that’s how it was when I went to college (the first time). If you were lucky enough to get the class schedule right the first time, you were feeling pretty good. That’s why we all registered the first morning of the first day, so we could hopefully be done before classes started! I should add that no admins had to work overtime this cycle, which made everyone happier as well.
Of course, the novelty of customizing printed output is long behind us and everyone probably registers for classes online. Nonetheless, it’s worth going over what RPM can do for you so you can get the output results you want, and don’t have to work any harder than necessary.
We use the same setup to produce PDF output as we do printed output and that alone might make this article worth a few minutes of your time.
The basics of TrueType fonts
I’ve used several font systems and honestly, I like TrueType fonts. They are well supported on Windows systems. They look clean, scale well, and are malleable, meaning you can stretch them and they still look decent.
We do bend and stretch fonts just a bit in RPM, depending on what you ask for. For instance, you could select “Courier New 12” and use whatever line placement that comes out. Or, you can select the font name, then select lines per page and columns per line. This would give you completely predictable results no matter your paper size or margin settings. In this case, the font height is reduced slightly to allow for whitespace between the lines, and the font width is adjusted to make 80 columns come out in a clean line at the right margin.
I’ve found that for roughly conventional settings, TrueType fonts give me a perfectly readable result. Naturally, that depends on factors like which font you use (Comic Sans, anyone?) and whether you are printing on a sheet of paper or postage stamp.
How to set the font
RPM uses the standard font selection dialog available to any application on your Windows system. My recommendation is that you select a font size at least as large as you need if not larger. As you will read below, RPM can reduce the font size but generally, it won’t increase it. For my printing needs, 12-point has worked fine so far but I’m not making posters, just regular text.
A note on OpenType
I freely admit that you may be using OpenType fonts. As a developer, I don’t know which font type Windows might use in a given situation, but so far they all seem to work about the same. Your results may vary on that.
On margins and page orientation
Here we introduce our Text-to-Text Markup setup. Text markup is our internal format which includes font and line settings among others. We use it for Windows text printing, for PDF generation, and PCL and HTML as well. TIFF and PostScript are byproducts of PCL so we could include them here.
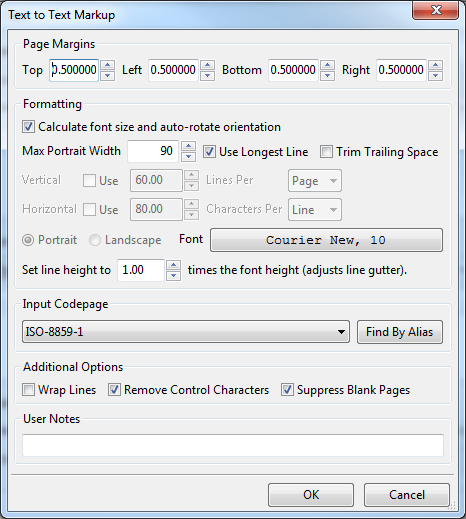
Here we have the Text to Text Markup setup dialog. You’ll note that we include several settings including margins, page orientation, font and font size, and several controls for line spacing and character width. Much of the focus for text markup is “making text fit” although you can specify lines per inch and columns per inch if you like. We feel that finding the best fit is a good way to make your output come out right, although that’s not always the case.
We’ll talk more about the settings as we make our way through this article.
We don’t include the page size in text markup since experience has shown that this is more closely related to the final output stage. You can select the page size when you generate a PDF. On the other hand, RPM doesn’t know the page size for text printing until it opens the printer and starts processing your job. This means you could set half-inch margins whether you had US Letter paper, or A4 (or even A3). Similarly, the top and bottom margins are on the long edges with landscape and the short edges with portrait.
4 ways to control page layout
COR
“COR” is pronounced “core” like “apple core”, or if you are British, then it sounds like the expression. Not on purpose. We used to have a colleague on staff who worked with the IBM AS/400 at a previous job. He introduced us to a lot of technologies we had never heard of (my background is Unix and before that, Data General).
“COR” stands for “Computer Output Reduction”. After all these years I’m not sure what that name means, exactly. But, it does a pretty good job of normalizing the results somewhat. In practical terms, you could send a printout through “COR” and it would most likely keep you from wasting pages with a couple of printed lines left over from the previous page; or, even worse, keep your output from being truncated at the right edge of the printable area.
Depending on how wide your lines are, or how many lines per page you have, COR will step down the output size. It will also rotate the page from portrait to landscape when it seems to be needed. It’s not an artificial intelligence system but it does a pretty good job in many situations.
Note that COR output is independent of your exact paper size. It will specify lines per page, not lines per inch. This is meant to keep your output looking consistent even if you select different paper sizes or margin settings. For instance, lines should not bleed onto the next page if your paper size changes.
We recommend that you at least try COR if you have a variety of text formats coming into a single queue, or if you find you can’t always predict the line and column size. IBM has a depth of customer experience in business printing. So, this may be worth a try. The auto-page rotate feature alone might come in handy.
How to use COR with plain text
COR is meant to use text markup as input. It takes the text markup apart, refactors it, and reassembles it in a way that makes sense according to its own rules. COR ignores the settings that control line spacing and line width and focuses solely on the printed data itself.
To use COR with text input, first, add a Text to Text Markup transform. Select the two settings “Use Lines per Page” and “Use Columns per Line”. Leave the default values for these settings alone.
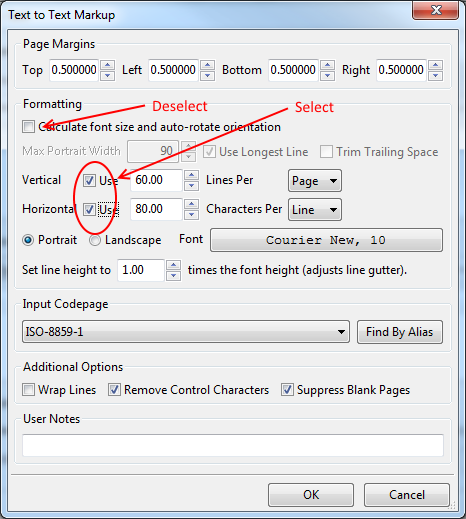
What we gain from this is to prevent the text markup transform from doing a bunch of analysis on your text, at least concerning line and page length, since that’s what COR does. The values of 60 and 80 are irrelevant. The text markup transform will not truncate or alter your data in any way. Neither will COR. It merely provides optimized settings in the text markup output that will let the actual output generators do their best job rendering. Here the output generators would include generating PDF or rendering text on a Windows printer.
Finally, add the COR transform following the text markup transform:

Note that there are no options for COR. It uses it’s own internal rule set.
How to use COR with SCS
SCS is an IBM-specific data format. It can include extensive line and page formatting commands. The interesting thing about SCS is that … it might not. We have seen the full range of SCS documents from tightly controlled output to the plainest of text.
However, SCS is still EBCDIC and it contains some SCS command codes, surely. So, you’ll need to add the SCS transform in place of the Text-to-Text markup transform. Here is an example:
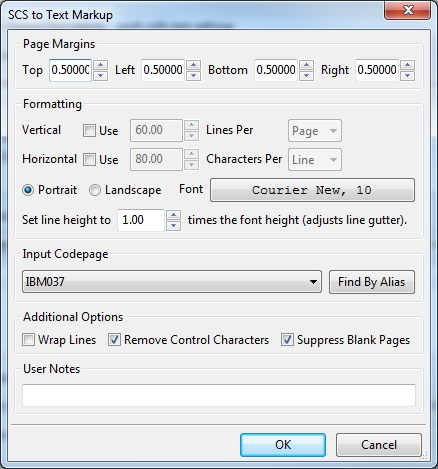
You should change the margins in this dialog if you want something besides the defaults, and be sure to change the input format if needed. However, you do not need to set the line and column spacing because of course COR ignores that and will generate its own.
After the SCS transform, add the COR transform as we did above.
I recommend using COR with SCS if your SCS documents do not contain adequate formatting or if you wish to normalize the output so it’s a bit more consistent. It’s not mandatory but something that has helped others, so it could be of use to you.
Auto-calculate
We saw the Text-to-Text Markup setup earlier. By default, auto-calculate is selected, so let’s assume that here.
Auto-calculate refers to our algorithm where we examine some portion of the early pages of the input and attempt to generalize settings that work. For instance, if the line lengths don’t exceed 82 except the one line that’s 196 characters long, we may arrange for that long line to be wrapped and set the line length to 82.
But, if you select the “Use longest line” setting then we will shift that logic to prefer the longest line length as our page width.
We’ll do similar things with the page length, assuming there are page delimiters in the text.
Lines per page, columns per line
I assert that using lines per page and columns per line is a particular model for fitting text to a page, particularly when you don’t know the physical page in advance.
For the sake of example, let’s consider my standard test print size. I have about half a million test files. At least half of these are 80 columns per line and 60 lines per page.
By setting my text markup dialog to use 80 columns per line and 60 columns per page, I will have no surprises whether:
- I change the margin from half an inch to one-quarter inch
- I change the margin to an inch
- I shift from portrait to landscape; I admit portrait will look better but I won’t have crazy line remnants every other page when I change the paper size, even radically
When you use lines per page and columns per page, RPM looks at the size of the output page, uses the printable area to factor in the margins, then divides the printable area up and sets the font width and height accordingly.
There is another hidden benefit here as well. If you want to set the lines per page but let the line width default, RPM will do that; actually, TrueType will do that. Remember that I like working with TrueType! RPM will also let you set the line width and then default on the lines per page, that is, the proportion of the line height will be the default for that font. I tried it and it looks OK but I’m not sure when you would want to do that.
Lines per inch, columns per inch
We have talked to many customers over time who struggle to make “lines per inch” and “columns per line” work out right “all the time” for them. Much work has gone into RPM to make that unnecessary, and I feel that the results show fairly that it works. And works easily.
If you have jobs coming in that have slight differences in formatting, you may be better served by using one of the techniques outlined above.
However, if you have pre-printed forms or other reasons to fine-tune your printed output this way, then RPM can and will accommodate. Chances are that if you need this, you know exactly what you are doing!
Conclusion
I hope this article helps you better understand and hopefully trust RPM’s ability to process text sanely. It’s certainly not a new feature; the very first pre-release had a precursor to the capability RPM features today. The nontechnical users grasped it right away and were able to use it on their own, with results that satisfied them.