
The Diagnostic Log
Screenshots in this article are from RPM 7.0.
Diagnostic logging is the most advanced logging mechanism in RPM. We recommend changing these settings only if directed by a support staff or development team member. And once your issue has been resolved, we recommend resetting it to the default values.
We added diagnostic logging to RPM in 2014. We had several goals in mind:
- turn logging on and off for specific parts of RPM
- produce a more detailed log than the event log or message log
When we start the program, we erase empty log files and keep no more than seven diagnostic log files for this program. This way, you don’t need to be concerned about log files consuming your disk, assuming you don’t go heavy on the logging and don’t run the codes for months.
Diagnostic logging exists because we needed to find ways to document what specific parts of RPM were doing at a given time.
By contrast, the message log is a summary statement of something that happened, and the event log is more of a status log.
I’ve had people look at the diagnostic log and tell me it doesn’t show any errors. My response to that is it often doesn’t report a fault but is more useful for what it does say and what should be there but isn’t.
What we do with the diagnostic log
Typically, RPM and other programs we distribute create a diagnostic log each time they run. By default, we configure the log to produce enough information that our technical staff can verify basic functioning.
To diagnose a problem you may be having, the technical staff may ask you to configure your diagnostic logging to track more settings. How to do that is explained below.
Usually, you would make those changes, restart the RPM service, reproduce the problem (or wait for the problem to happen again), then stop the service and send us the logs via email.
Once we (together) resolve the issue and you’re back to standard processing, you should first clear the diagnostic log settings, except the defaults. We’ll show you how to do that.
There’s not a good reason to keep the settings on “just in case” if the problem is fixed. It just makes processing take longer and consumes a lot more of your disk space.
Note of warning
If you turn on every diagnostic log setting, we can almost guarantee that RPM will run very slowly, or not at all. Please do not do this.
How to configure the diagnostic log
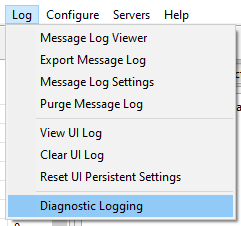
In the user interface, go to the Log menu and select Diagnostics …:
Next, you should see the Diagnostic Log form for the RPM service program, RpmSrv:
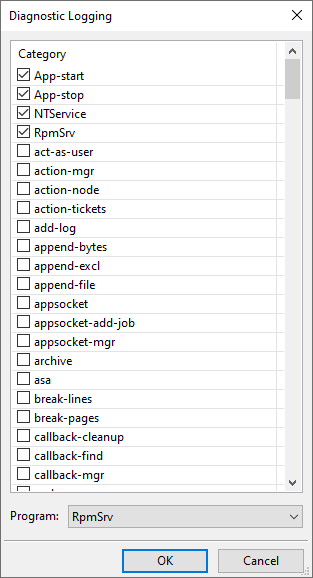
Note that the four categories at the top are checked. These are the default settings. We’ll come back to those later when it’s time to reset.
Please note that some settings on this form will slow RPM down severely, so please don’t experiment.
At the bottom of the form, Program shows RpmSrv as the selection. You can use this same form to change the diagnostic log settings of the other program distributed with RPM. Click the program list to see it:
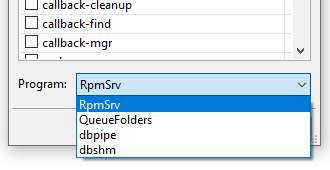
Besides RpmSrv, the list has QueueFolders, the Queue Folders folder watcher.
Once you have finished, click OK to save this configuration.
After this, you may need to restart the service. RPM will receive a notification that the diagnostic log settings have been updated. Some parts of RPM run from start to finish and don’t process the change in diagnostic log settings until the program restarts.
What to do with the log when you have one
RPM keeps its diagnostic logs in the Logs folder of the RPM data folder, normally C:\ProgramData\Brooks Internet Software\RPM\Logs. Each file name starts with the program and ends with the date and time the program started.
Here is a directory listing of that folder on my machine:
 Directory of C:\ProgramData\Brooks Internet Software\RPM\Logs

11/10/2026  07:33 AM             1,715 capture-test.log
11/12/2026  11:44 AM                 0 queuefolders-20261112-114449.log
11/12/2026  09:00 AM               522 rpmsrv-20261112-090029.log
11/12/2026  09:59 AM            12,793 rpmsrv-20261112-090030.log
11/12/2026  09:59 AM               522 rpmsrv-20261112-095938.log
11/12/2026  10:35 AM            12,793 rpmsrv-20261112-095939.log
11/12/2026  10:35 AM               522 rpmsrv-20261112-103533.log
11/12/2026  10:35 AM             8,235 rpmsrv-20261112-103534.log
11/12/2026  11:44 AM             8,107 rpmsrv-20261112-114446.log
These files are small because only the default settings are on. If you have selected more diagnostic log settings and run RPM until you get the results you need, you’ll have a much larger file. These are text files, and they compress very nicely with a file compression utility such as zip or 7z.
Email one or more of these log files to our technical support staff.
How to get the log back to normal (default logging)
- In the user interface, go to Log > Diagnostics …
- Make sure the top 4 categories are checked
- Make sure all the other categories are off; scroll down to check.
- Click OK to activate these settings and to store them.
What are the default settings in the log
These are the default settings:
- App-start, App-stop, NTService, RpmSrv
It’s helpful to us to have these settings on. The log files they produce are a few kilobytes each, which by modern standards is tiny.