
Please note
Before installation, verify your computer meets the minimum requirements.
- Windows 2000 or later
- Internet Explorer 5.01 SP2 or higher
Installing INTELLIscribe
INTELLIscribe is distributed with a Windows setup program, which guides you through the installation on your computer. The setup program installs and initially configures all files needed to operate the software.
Here is the step-by-step installation process.
- Run the setup program downloaded from our website or the single file executable (intelliscribe.exe) located on the installation CD.
- At the Welcome screen, click Next.
- License Agreement After reading and agreeing to the terms of the software license, click Yes to proceed. If you choose No, the setup will not continue.
- Select Destination Location Choose the destination folder for INTELLIscribe. The default folder is C:\Program Files\Brooks Internet Software\INTELLIscribe. Click Next.
- Select additional tasks Decide whether to add shortcut icons in your Startup group, the desktop, or the Quick Launch toolbar. INTELLIscribe runs as a service; these shortcuts are optional and unnecessary for program operation.
- Ready to Install Setup displays information about your selections. Review the information in this dialog. If you want to make any changes, click Back. When you click Install, all files necessary for INTELLIscribe will be copied to your computer.
- Completing Setup will prompt you to restart your computer in some circumstances. If prompted to do so, choose Yes. Setup will then restart Windows. Note that the setup configures INTELLIscribe to start automatically when the computer is started.
Initial INTELLIscribe Setup
To configure INTELLIscribe initially, start by creating a virtual printer port. Complete the following steps to add a virtual printer port.
Creating a Virtual Printer Port
The Virtual Printer Port Wizard guides you through the steps of adding or updating a virtual printer port.
- To add a new port, select Add from the Port menu. To update an existing virtual printer port, choose Update from the same menu. A welcome screen explains the Wizard's purpose. Click Next to begin configuring the port.
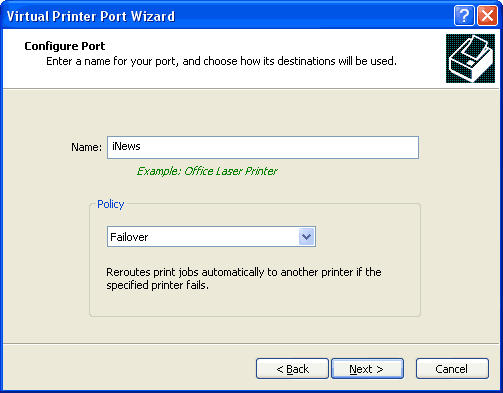
- Configure Port The Configure Port step allows you to enter the name of the virtual printer port and select a port policy.
- Name This field should contain the name of the virtual printer port. Each port must have a unique name. A name is required when creating a new virtual printer port; the name cannot be changed when updating a port. The port name has no size limit and can contain most characters, including spaces.
- Port Policy Select the policy you want this port to use. Port policies determine how a printer is selected when a document is printed; the policy also determines how the port handles a printer failure. If only one destination is available, the policy selection is ignored. The available policies are outlined in the following table. When you have selected a policy, click Next.
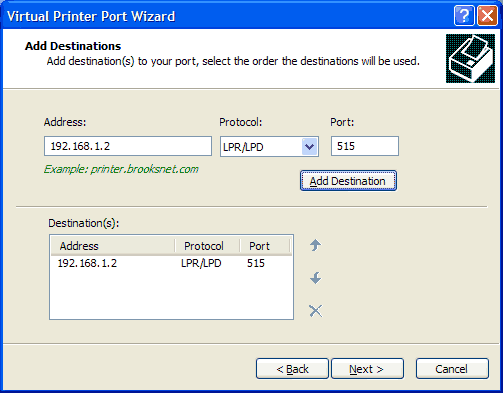
- Add Destination(s) The Add Destinations step allows you to create a printer (destination) or group of printers that the virtual printer port that will send documents to. You will need to create more than one destination if you want to use the port policies (as discussed in Step 2b) effectively by sharing print duties between printers.
- Address Enter the IP address or hostname of the printer or print server.
- Protocol From the list, select which protocol you want this printer to use. You should verify that the protocol is supported by your print server. Most hardware print servers support the LPR/LPD protocol.
- Port Enter the TCP/IP port number the print server is listening on for print requests. The default port number for LPR/LPD is 515 and is entered automatically. Most single-port JetDirect print servers receive data on port 9100; this port number is entered automatically when selecting the JetDirect protocol. Consult your print server's documentation for detailed information.
- Destination(s) This box contains a list of destinations (printers) that have been created for the port. If updating an existing port, the list will be populated automatically.
- Buttons The Up and Down buttons increase or decrease the priority of the selected destination. If only one destination is available or if the destination is already the highest (or lowest) priority, the buttons do not perform any operation. The Delete button deletes the selected destination, but there must be at least one destination to continue.
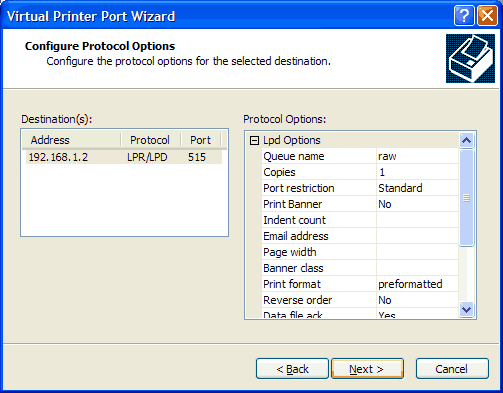
- Configure Destination Options This final step allows you to customize the configuration of each destination (see side note). This step has protocol-specific attributes as well as destination-specific settings. You must specify a Queue Name for each destination using the LPR/LPD protocol.
- Destination(s) This lists all destinations entered in the previous step. Highlighting a different destination populates the Settings list with the destination's current configuration.
- Settings The Settings list displays either an LPD settings list or a JetDirect settings list depending on the highlighted destination. Each protocol has a different set of options that can be configured.
- After you finish configuring the destinations, click Next. At the completion page, click Finish to complete the process of adding (or updating) your virtual printer port.
Windows Add Printer Wizard
Now that a virtual printer port is configured, a Windows printer must be created. The Windows Add Printer Wizard guides you through this process. Depending on your Windows operating system, these steps and screenshots may differ slightly.
- Open the Printers folder and start the Add Printer Wizard:
- Windows 2000 From the Windows Start menu, open the Settings menu and choose Printers. In the Printers folder, double-click Add Printer.
- Windows XP From the Windows Start menu, choose Printers & Faxes. On the left side of the Printers & Faxes folder under Printer Tasks, click Add a Printer.
- Windows Vista From the Windows Start menu, choose Control Panel. In the Control Panel, beneath Hardware and Sound, click Printer. In the Printers folder, right-click the white portion of the screen, open the Run as Administrator menu, and choose Add Printer. At the User Account Control dialog, press Continue or enter your password as required.
- The Add Printer Wizard is started. At the Welcome page, click Next to begin adding your new printer.
- Local or Network Printer Choose how this printer is attached to your computer. Choose the Local printer attached to this computer and deselect Automatically detect and install my plug-and-play printer. Click Next. On Windows Vista, simply click Add a local printer.
Note Only printers using the Windows Printer Sharing service are considered network printers. All other printers, including INTELLIscribe printers, are "local printers."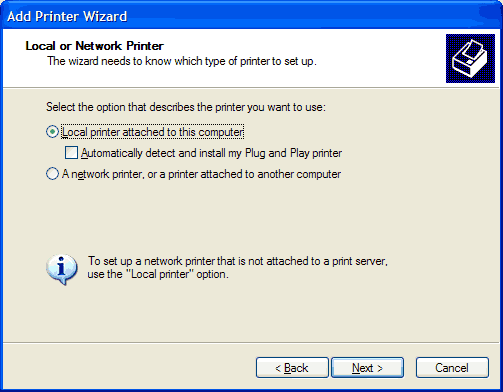
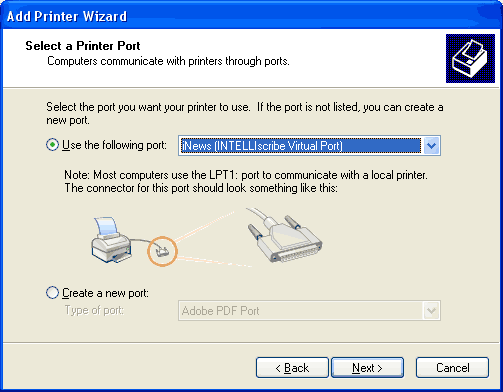
- Select a Printer Port Now select the port you want to use with this printer. You should see the INTELLIscribe virtual printer port(s) you created previously.
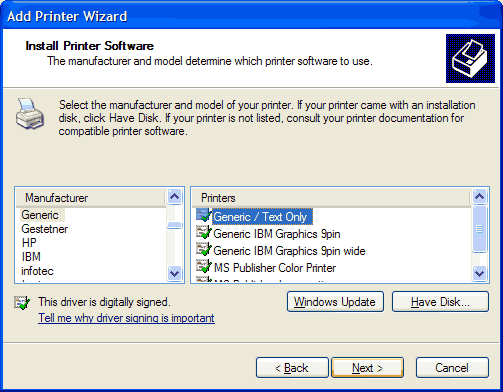
- Install Printer Software Select the manufacturer and model of your printer. If your printer is not listed, click Have Disk and insert the printer manufacturer installation disk.
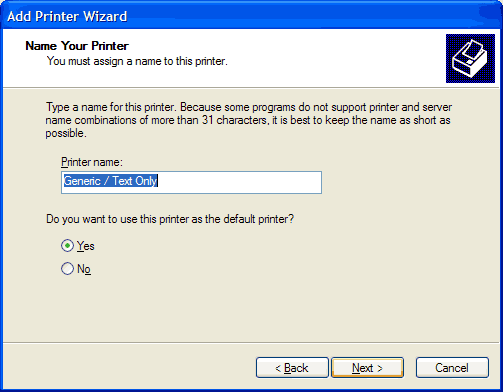
- Name Your Printer Type a new name for this printer or use the default name supplied by the wizard. We suggest using a descriptive name. You also must choose whether or not you want Windows-based programs to use this printer as the default printer.
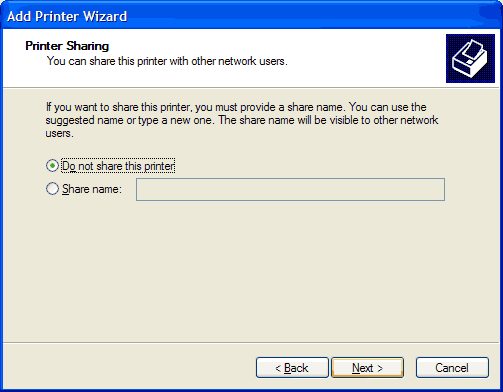
- Printer Sharing Select whether or not to share this printer. If you decide to share the printer, type a share name for use when connecting from other computers on the network.
- Location and Comment Enter descriptive information about the printer. You will see this information when you initially attempt to connect to this printer from other computers on your network.
- Print Test Page Finally, choose whether or not you want to print a test page. Click Finish.
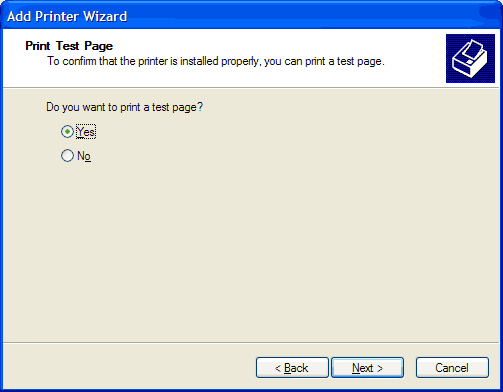
- Windows will now install the printer and may ask for the Windows CD or the printer manufacturer's installation disk. If so, insert the CD into your CD-ROM drive. If you elected to print a test page in Step 7, a test page is now printing.
Note When the Windows printer is created and associated with the INTELLIscribe virtual printer port, you are ready to begin printing.
Printing with INTELLIscribe
After you have set up the virtual printer port or ports in INTELLIscribe and created a Windows printer and assigned the virtual printer port to it, you are ready to begin printing through the port and using INTELLIscribe's other features.
Printing through INTELLIscribe from other applications is just like normal Windows printing:
- In the application (e.g. Word, Excel, Notepad, iNEWS, ENPS, and so on), access the Print dialog as usual and select the Windows printer you created and linked to the INTELLIscribe virtual printer port.
- Click Print. The document is printed through INTELLIscribe using the port's policies and settings. For example, if you have set up a virtual printer port that uses the broadcast policy, the news script you print once from iNEWS (or other application) is printed automatically to each network printer associated with the port.