
Text Markup
Screenshots in this article are from RPM 6.2.
Text markup is the vehicle we have created within RPM Remote Print Manager® (“RPM”) to contain all your text print setup for each print job. It includes line metrics, font information, and any special markup in the print job itself including overstrike and bold.
Text markup has been part of RPM since the beginning. The earliest version of text markup simply copied the settings from the Text Setup dialog. If you’re not familiar with RPM version 4.5 and prior, we’re talking about margins, lines per inch, characters per line, font name, that sort of thing.
When we added SCS support to RPM we extended text markup to include all the features needed to print SCS properly.
In RPM the text markup has all the features we need to support SCS and several input text formats.
Where text markup came from
When I first created RPM, I included a function that would let you very quickly send text jobs to a Windows printer. I also assumed that your text was not formatted, so I did the formatting for you.
- You set the page margins.
- You set the lines per page, typically 60 lines, and columns per line, typically 80 columns. But it could be anything.
- You select a Windows printer.
- You select any font available for that printer.
Then, whenever RPM printed a job, it analyzed the size of the paper loaded in your paper tray and the font you chose. Next, RPM automatically scaled the font size to fit correctly. Finally, it did all the calculations to make your print job appear just as you specified. And it all took very few buttons to click.
This feature was very popular. I first released RPM before student registration at a major university. Dozens of campus staff used the first release of RPM without special training, and we minimized student wait time as we printed their class schedules on demand and at their current location.
That function had exactly one input, plain text of any format, and exactly one output, a Windows printer. RPM read the file, analyzed the data, completed all the calculations, and printed everything in one giant step.
When it came time later to expand RPM to do new things with print data, I quickly realized that this approach needed to be more scalable. So, I came up with a markup language describing print data elements. That is text markup. Once RPM reads print data and generates text markup, we can move to the next step, creating one of several outputs.
Consistent results
The most important advantage of text markup, we feel, is that you get consistent results whether you are printing to a Windows printer, generating PDF, or converting to PCL or HTML. Once you discover the settings that work best, you can reproduce those results simply.
Unicode support
Text markup is designed to support Unicode. When you look at the setup descriptions, you’ll notice an input code page or data format for each one. Internally RPM will translate the data into UTF-8 from the format you choose.
The outputs then assume they are getting Unicode data and process accordingly. This is particularly valuable for text printing and printing to PDF, where both use Unicode to generate output for any language assuming you select the right font.
Inputs
Plain text can include ASCII (Latin1) or anything that RPM can easily translate to text, including EBCDIC and code pages such as Traditional Chinese.
RPM uses a broad definition of “plain”, and these are the rules it applies when analyzing text:
- We can use carriage return and line feed independently. Line feed always means “end of this line, start a new line.”
- Carriage return means “back up to the beginning of the line.” If the carriage return is followed by a new line, as it often is, we simply follow the typical convention of carriage return/line feed. Otherwise, carriage return means that we will repeat portions of the text.
- Another way to repeat text is with a backspace character. RPM understands the two most widely used, Ctrl+B and Ctrl+H.
- When text repeats, there are one of two possibilities:
- The text is the same in each instance, in which case the user wants to bold
- The text is different, in which case the user wants to overstrike
SCS is an EBCDIC-based markup format created by IBM. It can include line width and height but does not necessarily. This is why the SCS transform includes those settings. The SCS print job will override but at least you can specify the minimum results you want.
ASA is a text-based markup format that is one of the first to be used in digital printing. It used to be well known as “Fortran printing” — the ASA command codes were what you used for printed output in the early Fortran days.
First Character Forms Control is a specialty format similar to ASA but less widely used.
COR both reads and writes text markup. See Computer Output Reduction below for what it does and when to reach for it.
Outputs
Once you have converted your print job to text markup, these are the things you can do next:
- Windows printing through the text print action
- Output to PDF, commonly archived or emailed
- Convert to PCL, typically printed or fed to a document management system
- Convert to HTML or plain text, commonly archived or emailed
Strictly speaking, only the Windows printer is an output. PDF, PCL and HTML are closer to goals, in that we hope to represent your printed page accurately and identically in each instance — PDF should come out as close as possible to the printed page. The rest are files, and once RPM has a file it can save it to disk, attach it to an email, upload it to an FTP server, send it via TCP/IP to a networked printer, or run a program on it. You could use “curl”, for instance, to send files using protocols RPM does not support internally.
Layout control
Within text markup, you have control over page layout and font sizing, both width and height.
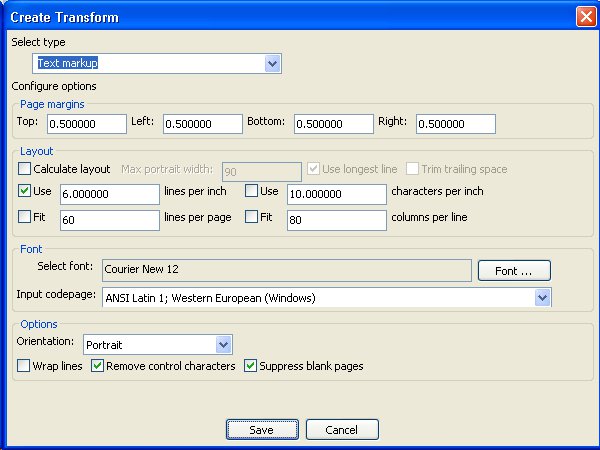
Let’s take a look at the controls in the text markup dialog, which appears to the right. After you set the margins, in units of inches, you have the layout functions.
Calculate layout
We added, “Calculate layout” or “auto-calc” to RPM in version 5.0 to convert plain text that had been sent to the text print action or the PDF transform. To give the user the best shot at a decent printout, we decided to try to analyze the data, rather than go for default lines per-inch setting.
Check the “Calculate layout” box to enable this function and the settings that go with it. Note that you can use “Calculate layout”, or line and column settings, but not both. When you use this function, RPM reads through the data looking at line lengths and number of lines per page, assuming it finds form feeds. After looking at up to 64K bytes of data, RPM will determine the line and column settings that fit the data.
Please note:
- If RPM determines the lines are longer than “max portrait width” it will force the output to landscape
- RPM will either use the longest line length or a weighted average of the line lengths
- RPM can optionally trim whitespace from the ends of the lines before making the length determination
Auto-calc sets columns per line and lines per page to what it measures, so it can easily produce awful-looking results if your line or page lengths are inconsistent. If your lines and pages are pretty uniform but not perfect, it is a good option.
One behaviour worth knowing: if you use a text print action and it sees plain text arriving rather than text markup, it will create a text markup transform for you, set auto-calc on, and pass the job through that. That may or may not suit your data, which is why our advice is to add a text markup transform of one kind or another yourself whenever you print text to a Windows printer.
Use and Fit settings
By default RPM expects the user to set the page sizes that work for you.
- You can use lines per inch, lines per page, or neither but not both
- You can use characters per inch or characters per line, or either but not both
If you use lines per page or columns per page, then RPM determines the actual lines per inch or columns per inch from the page size when you output. This is described below.
Computer Output Reduction (COR)
COR was intended to match a similarly named setting on the iSeries that set lines per page, columns per inch and portrait vs. landscape based on the text in the printed page. It improves your printed output by making your pages look more “full” without stretching or shrinking the font. COR stands for “computer output reduction” — a title I never understood. We found the rules for COR online and implemented them.
The RPM COR transform reads text markup, strips out the line and column settings, and substitutes new ones based on the actual content. To use it, add a COR transform immediately after whatever transform you used to produce text markup.
Text metrics
We mentioned earlier that RPM prioritizes line widths and page length, or columns per line and lines per page. That’s why 6 lines per inch is turned on by default.
- What happens when you set lines per inch
- RPM calculates the line spacing as (72 / lines per inch). For 6 LPI the line spacing would be 12.
- RPM factors in some white space between the lines and reduces the font size down just a bit
That’s why, in our example, changing the font size in the dialog had no effect. RPM was going to change it anyway based on the lines per inch.
- What happens when you set characters per inch
- RPM creates a font with that width. However, Windows doesn’t usually allow us to create a font with zero height, so we again use a factor based on experience and information from the Windows font data to come up with a font height. Usually, the width is about 60% of the height.
- RPM then calculates a line spacing that allows for a little white space. Since you didn’t ask for a font height, we figured that whatever looks good is all right.
- What happens when you set both lines per inch and characters per inch
This is actually slightly easier.
- We calculate the line spacing and set the font height as with lines per inch.
- We set the font width but don’t need the Windows font data this time.
- What happens when we set lines per page
- RPM looks at the page size we’re working with
- Take the total height, subtract the top and bottom margins, leaving the print area height in inches
- Divide that by the number of lines, leaving lines per inch
- Calculate lines per inch as above
- What happens when we set characters per line
- Given what we do above, this is what you would expect: take the page width, subtract the left and right margins, divide what remains by the number of characters per line
- Set the characters per line as above
Every other combination works as you would expect:
- lines per page and characters per line
- lines per page and characters per inch
- lines per inch and characters per line
- etc.
Related reading
- How to Control Font and Page Format walks through the same layout decisions as a task, with screenshots of each setting
- Text to Text Markup transform is the transform that produces text markup from plain text
- Transforms covers the other 36 transforms and where they sit in a queue