System setups • AIX 3.x • AIX 4.x • AS/400 • CUPS • HP3000 • HP9000 • Legacy Mac • Linux • Mac OS X • Mainframe • Sun Solaris • Sun OS • Windows
The purpose of this document is to assist you in configuring the Common UNIX Printing System (CUPS) to print through RPM. It is intended for systems administrators familiar with CUPS and LPR/LPD printing. For these instructions, you need to know the IP address or DNS hostname of the computer on which RPM is installed.
Creating a Queue in RPM
- In RPM, go to Create from the Queue menu.
- Enter the name of the new queue you wish to add and click Create. The new queue will be created.
- Highlight the queue and choose Settings from the Queue menu. Add the action(s) necessary to produce your desired results. For instance, if you want to archive the file to disk, add Archive to disk. If you want to print the documents, choose a Raw printer action.
- Now add any transforms you require. Macs typically send complex PCL or Postscript data, which can limit the number of useful transforms. You could insert a PCL banner page or use a string translation to modify the requested printer input tray. More complex transforms, such as converting to PDF or removing PCL codes, may not produce desirable results.
Note: These instructions are intended to provide only a brief introduction to RPM configuration. For more detailed instructions, refer to the RPM manual.
Creating a Mac OS X LPR Printer
- We recommend you perform a telnet test to verify your Mac can connect to RPM. To do so, type the following at a command prompt: telnet <address> 515. Substitute the IP address or hostname of your RPM host where appropriate.
- A successful connection shows a "connected to <address>," message indicating connectivity. After pressing Enter, the connection will close and show an "unknown LPD command" message. If the RPM log has this same message, your telnet test was successful.
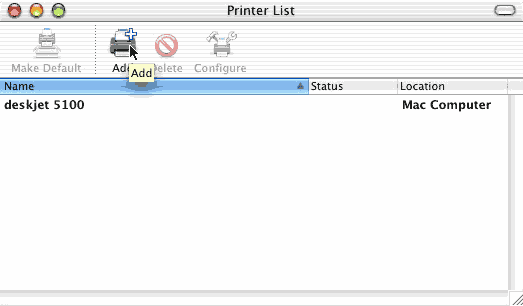
- For Mac OS X 10.2.8 or earlier, choose Edit Printer List from the Printer menu in the Print dialog. For Mac OS X 10.3 or later, choose Show Printer List from the View menu. The Printer List window appears. Click the Add button to begin adding a new printer.
- From the drop-down list at the top of the dialog, choose IP Printing.
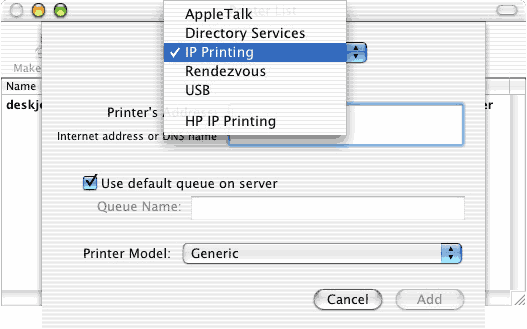
- Enter the IP Address or DNS hostname of the computer running RPM. Deselect Use the default queue on the server and enter the name of your queue in RPM. From the list of available printer models, select your printer. If your printer is not listed, contact the printer manufacturer for a supported Macintosh print driver.
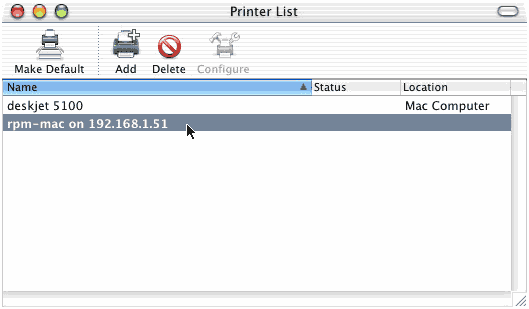
- Click the Add button. Your new printer will be installed and listed in the Printer List window. Now, close the Printer List window.
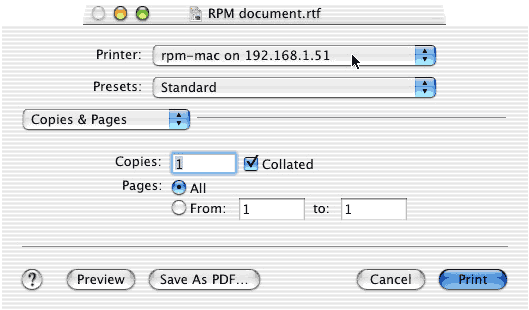
- When you wish to print to this printer with a file open, choose Print from the File menu. Select your printer and any other options desired, and click Print.
If you are using CUPS on your Mac, please review our CUPS setup guide.