One question people often ask is whether RPM Remote Print Manager® (RPM) can reprint jobs that it has already processed.
The answer is "yes," but there are a few things you need to do to set this up. We'll cover those below.
Let's first cover RPM's built-in tools for reprint and then talk about a suggested practice for managing large numbers of historical print jobs.
RPM's built-in method
Using the RPM user interface, double-click on a queue in the list. I've selected my "archive" queue. Here's the setup form:
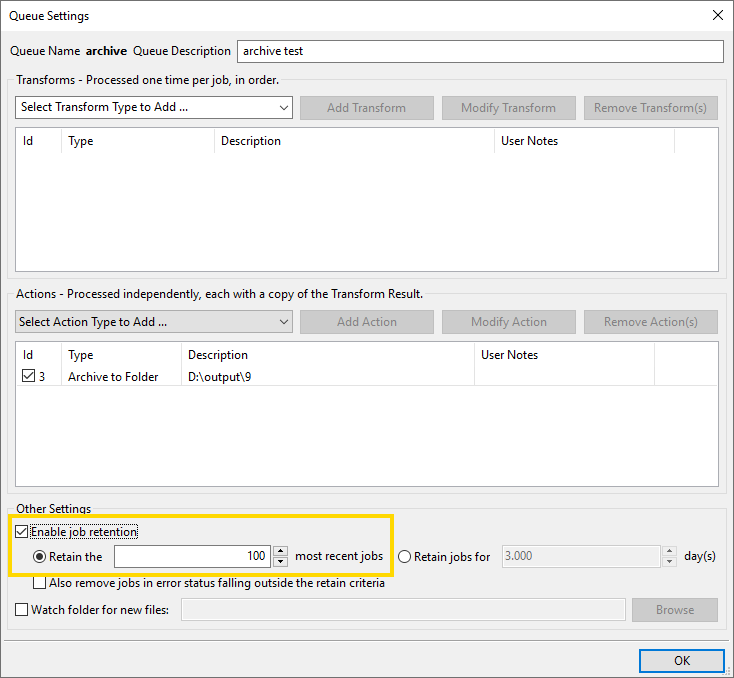
Note in the highlighted area that I've selected "Enable job retention." The default setting is to retain the most recent one hundred jobs, but you can make it anything you like.
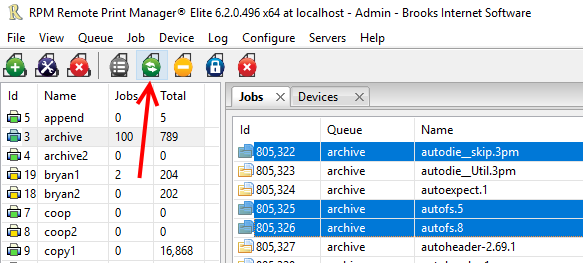
After setting retention, I sent 789 jobs to RPM. Once the jobs complete processing, the jobs view should show you something like the following:

There are several items to note. First, the red arrow points to the "100" which is the number of jobs the queue has at the moment. The last 100 jobs created remain in the queue because of the retention setting.
The other item is the job status is set to "complete" which is denoted by the yellow highlight in the last column on the right. Also, the job icon shows a folder. Anytime you see the folder icon or the "complete" status, the job is in the queue due to the retention policy.
How to reprint
Any jobs you select in the jobs view are eligible to reprint. In this image, I've used Ctrl+click to select three jobs at random.
As soon as I select the first job, four buttons in the toolbar activate automatically. The red arrow indicates the reprint button.
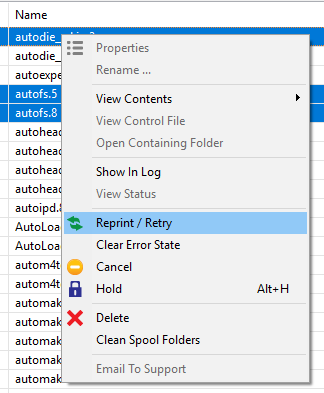
You can always use the right-click menu once you have selected one or more jobs. Here is the right-click menu with "Job reprint" selected:
Retaining jobs by a period
It may work better for you to retain jobs for a given period. For instance, if your business prints over the weekend, you might set two or three days for job retention so that if you want to reprint a weekend job, it's right there waiting for you.
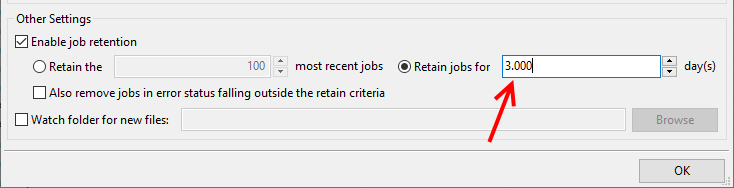
You can set RPM to retain jobs for a given period by selecting "Retain jobs for" and entering the number of days.
Pro tip: how to retain by the minute
If you noticed that RPM's "days" setting is 3.000, then you might guess that RPM can use fractional days. You would be right.
Let's say you want to keep jobs for 30 minutes. The number of minutes in a day is 24 x 60 = 1440.
30 minutes then represents 30 / 1440 = 0.020833
When I entered 0.020833 into the "days" field, RPM rounded it to 0.021, which comes out to 30 minutes and 14 seconds, give or take.
When does RPM remove the job?
When the queue retention policy is the number of jobs, RPM checks the current number of print jobs in the queue when it creates the next job. If the new job raises the total amount above the retention setting, RPM removes the oldest job in that queue.
When the queue retention policy is a period, RPM sets a "remove at" attribute in the job to the current time plus the period. If RPM is running when the period is up, it automatically removes the job. Otherwise, RPM removes these jobs on startup.
Suggestion for managing large numbers of print jobs
Occasionally we talk with a customer who has retention set for ten thousand or more jobs "just in case" they might need to reprint. The only problem is that it takes resources for RPM to track all these jobs. And there are ways you can avoid the additional overhead and still have what you want, which is the ability to reprint past jobs.
I don't claim that this approach is the best way to manage large numbers of jobs you want to print later. However, please consider this a starting place, and make whatever changes fit your situation.
My suggestion is basically to do this:
- rename your existing queue to something you can easily keep track of without confusion
- create a new queue using the original name; we'll add two actions to it
- change nothing else in your network
We'll start with our "current" (imaginary) setup. Let's say you are printing to your HP 4200. I have one in my office, so I might have an RPM queue called "hp4200" where I send text documents. RPM preprocesses the text according to rules I set up in the text markup transform, with rows and columns and such. Then RPM sends it to my Windows printer definition using a text print action.
Add to this mix is my business system, a larger computer system of some sort that is generating jobs. That system uses LPD to send jobs to our computer using the "hp4200" queue.
The rename step
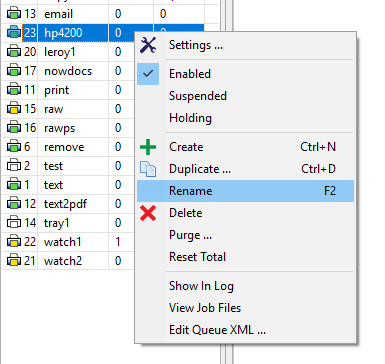
Our first step is to rename the queue. That's easy. Just select the queue in the queue list, right-click and select "Rename" from the menu.
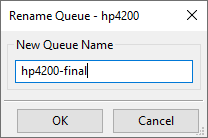
Use the form to enter a new name. RPM will do all the checking for you, so don't worry about using a valid name or a name that already exists. RPM can sort that out.
Create a new queue
Next, we'll create a new queue called "hp4200". That way, your centralized system will still have a place to send jobs. We don't want to change that configuration; I'll explain later why that is.
In the user interface, go to Queue / Create and enter "hp4200" as the new queue name.
The first thing we'll do is add a "Copy to Queue" action so that any job sent to the "hp4200" queue automatically routes to the "hp4200-final" queue.
If you need to open the queue setup form for "hp4200", do it now. Click the list "Select Action Type to Add" and choose "Copy to Queue" at the bottom of the list.
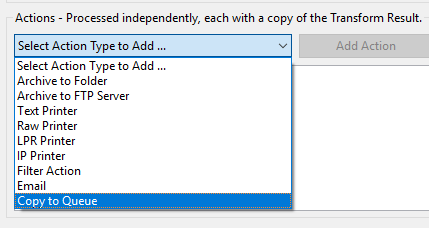
Now we'll add the action and set it up.

You don't need to be concerned about the other options in the Copy to Queue setup for this operation.
The core piece for this job-saving configuration
Next, we'll add an archive action, the central player in our job-saving setup. We'll need to decide two things at this point:
- where to put the jobs
- what to call them
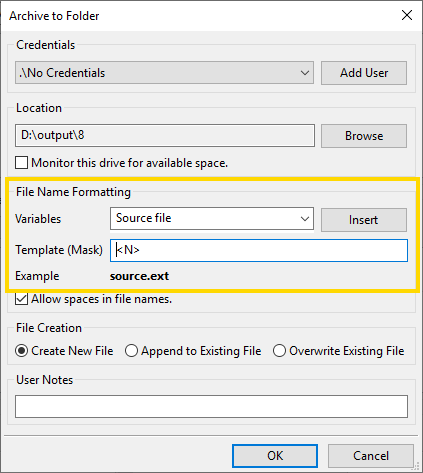
Let's get started. Create the "Archive to Folder" action, and enter a destination. This part is easy and, of course, no one but you knows the best place. I'll put mine on my D: drive, which has a lot of available space. I turned off "Monitor this drive for available space," but that's a personal choice, not a recommendation. If my machine were a production machine, I would consider leaving the monitor option set.
The second question is "what to call them," and for that, I have two possible suggestions.
The first suggestion is to use the name as it comes to you, which will be a great option if your job names are always unique. Only you would know that. Note that in the setup, I've inserted "<N>" in the user interface.
My second suggestion is that, depending on your situation, it may be more useful for you to organize these archived print jobs by date. That depends on your situation, and again, you would know best. If this option makes more sense to you, this is how you would do it.
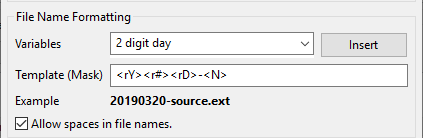
- Click on the Template field and use the Home key or your keyboard to move to the start of the line
- Open the Variables list, scroll to the bottom, and expand "Received Time." Click "4 digit year" then the Insert button.
- Click "2 digit month" then the Insert button.
- Click "2 digit day" then the Insert button.
- I clicked in the Template just before "<N>" and added a dash, which is personal style. Breaking text up helps me read it more quickly.
My Template field now shows: "<rY><r#><rD>-<N>" and the Example text shows "20190320-source.ext"
If you wanted to add the time of day, that would be simple as well.
Advantages
I believe the benefits of this approach include:
- you have a fresh copy of your original data. If you wanted to change how you process your data, you could easily make those adjustments then reprint as many jobs as you like.
- it should be easy to find past jobs using Windows Explorer
- it's harder to locate past jobs in RPM because we didn't design it with that in mind
How to reprint jobs from your disk archive
Using these example queues, this is how you would reprint your archived jobs.
- Make sure the RPM user interface is open
- and select the "hp4200-final" queue in the queue list. You want to use the final processing queue, assuming you don't need to save a new copy of this file
- drag the file or files from Windows Explorer and drop them on the "hp4200-final" queue
That's all it takes!
If you have any questions or want to see other print problems solved, please leave us a note in the comments. Thank you!