We recently talked with one of our software vendor partners in the health information field. This company’s software package manages patient records and relies on RPM Remote Print Manager® (RPM) Elite for a number of functions. By including RPM Elite with his product, he saves development costs by not reproducing the functionality that RPM already has. Plus, he has our support for issues rather than spending his own time.
He asked us how to split an incoming print stream up between two printers. The printer he is using at his customer site can’t keep up with the printing, but they have other printers available to share the load.
In this tips article, I’d like to explain some of the philosophical issues of splitting up print jobs. I have several decades experience working with print data, like many others in the field, and feel like I have some perspective on this issue.
The two things you need to know about print jobs before you split
RPM has a number of “actions” as we call them. Each of them does “something” to the print job, which includes print, run a program, email, archive and many others possibilities.
RPM has two actions which deal with printers specifically:
- Print the job as if it was text; this gives you, the user, control over the font, text size, lines per page, and all the related items including margins
- We can also print the job directly to the printer, without any control over the outcome like we have with text printing
Here is a peek behind the scenes for you. The text print action tells the printer what font and font size, page size, page orientation, and exact position on the page for every line of text. We repeat that information for every line and every page.
But, when we send a job directly to the printer, we assume that the print job already contains all that information. For instance, PCL print files (for HP and compatible printers) contain all this information. They are the perfect targets for printers to handle without any interference from us. The same is true of PostScript and many other print formats.
For those reasons, splitting a text print job up between printers is a totally different exercise than splitting up other formats. We’ll talk about text files first, then other formats after that.
Please note that if you want to split the print stream into 3 or more parts, you can adapt my advice below.
I also have some advice on how to drive the printers, which will hopefully help you keep out of hot water down the road.
How to split a text file into two separate print jobs if you create the print stream
Step 1: create a unique marker and insert it into your text file
If your application is creating the text stream then you understand better than anyone how to create a text marker. The goal of the text marker in this instance is to be text so unique you can guarantee it’s not going to be found in the file by accident.
I like to make things easy for myself. One way I do that is to work a little harder than needed on easy upfront choices. The better I do that, the more likely the solution works and I never have to hear later that the customer ran into unexpected problems. For that reason, I would never use a text tag like “starwarsfan” or “where-is-machu-picchu”. As unlikely as it seems, it’s possible that given a few million print jobs using data you have no control over, one of those strings might appear.
My advice for creating a unique text tag is to generate a GUID. This stands for Globally Unique Identifier. I did a search for “how to make GUID online” and found a number of results. This one seems to do the job: https://guidgenerator.com/online-guid-generator.aspx
I’ve included my step by step approach to making a GUID In the image below. Once you complete this process you’ll have a unique text string in the text box labeled “Results:”. You are free to copy this and use as you wish, although you should verify that is still the case when you use this site. Warning: don’t use GUIDs you don’t have permission to use, and definitely create your own, don’t use someone else’s.
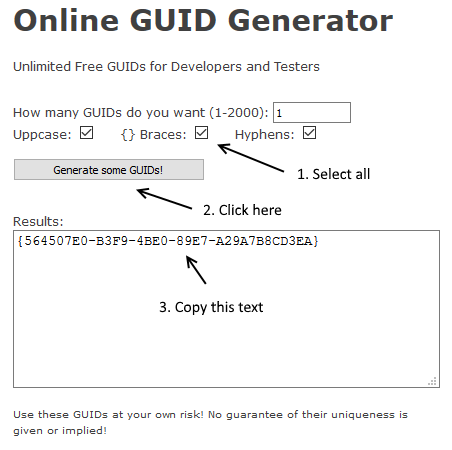
Now that you have a GUID, insert it on a line of text by itself in your document. I recommend not creating extra blank lines before or after this GUID.
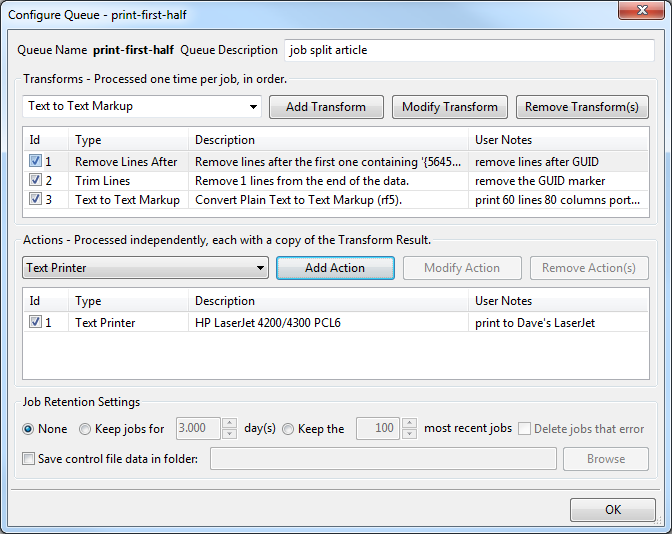
Step 2: create a queue in RPM to print everything up to but not including your GUID
Let’s name this queue “print-first-half”. Now, let’s add the transforms that make that happen.
This step assumes that you have used the “text to text markup” transform before this. If you want more information on the “text to text markup” transform, we have a page on this site.
You may not have heard of “Remove Lines After” transform. This transform passes text through unchanged until it sees a string or pattern you designate. After that, no more text is sent through.
Here is the setup for this transform:
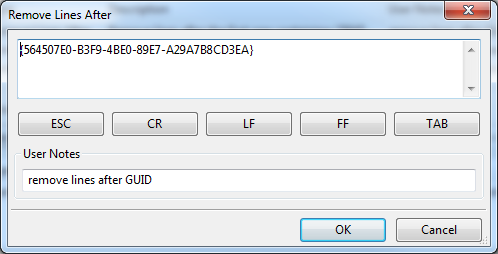
You’ll recognize our GUID string from the GUID generator above. Using this transform, RPM will allow text through until it sees the line with “{564507E0-B3F9-4BE0-89E7-A29A7B8CD3EA}”. That is the last line it will send through.
Of course, we’ll want to eliminate that line, too, because we don’t want “{564507E0-B3F9-4BE0-89E7-A29A7B8CD3EA}” appearing in our final print job. To do that we’ll include one more transform, “Trim Lines”. This transform removes the last number of lines from the input. For instance, if you send it 31 lines, and you “trim” one, the output will be the first 30 lines. Of course, you can use any number of lines you want.
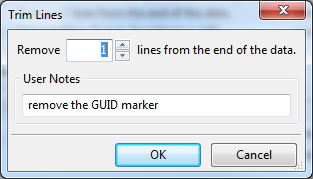
Here we remove the last line of the output. We have the value set to one.
Following that, we have our text to text markup transform. This is where we specify how we want each page to look. Finally, the output from this transform sequence goes to a Text Printer action. I have this set to the LaserJet 4200 in my office.
Step 3: create a queue in RPM to print everything after your GUID
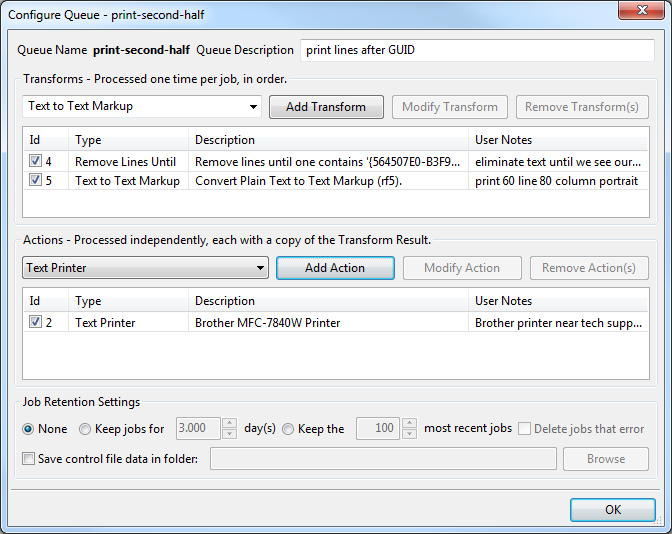
Let’s create a queue and call it “print-second-half”.
Here we will use the counterpart to our “Remove Lines After” transform from the previous step. It is called, of course, “Remove Lines Until”. Again, please note the setup dialog for this transform:
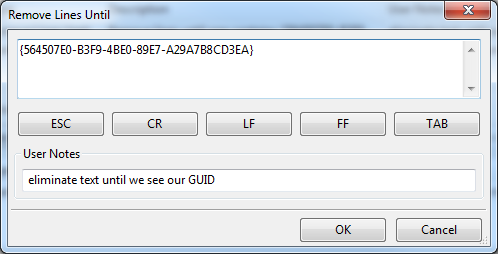
Again we have used our GUID, “{564507E0-B3F9-4BE0-89E7-A29A7B8CD3EA}”. The net effect of using this transform is that we will ignore the first half of our file, up to and including the line with our GUID.
We’ll follow this up with the “text to text markup” transform, and finally, send the printed output to a printer. The Brother printer is in the hall tech support offices. In a production setting it’s certainly more convenient to have the printers in the same room, but that doesn’t change the setup in RPM one bit. They are both on the network and that is the important point.
Step 4: create a print queue in RPM to send your jobs to.
Here we create the queue we send our print jobs to. The entire job of this queue is to send each print job to the other two queues. We do that with the “Copy to Queue” action.
Let’s create a queue called “split-print”. Here are the actions for this queue:
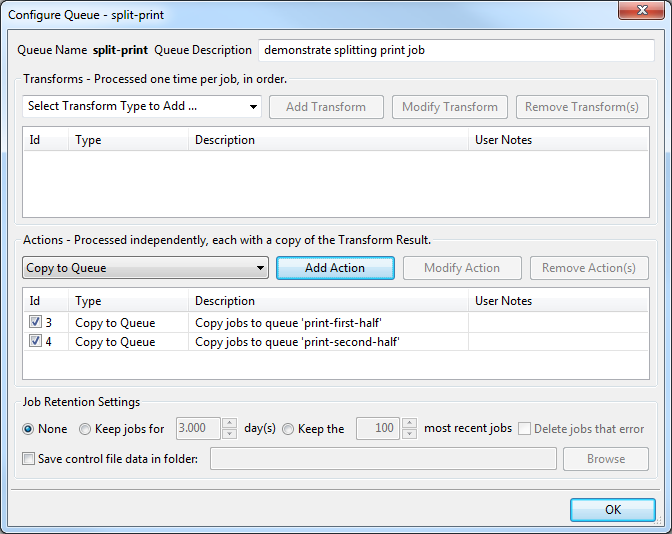
Note that all we do is copy the print job to the other two queues we created above. You might object that this is wasteful and inefficient. If you are in a situation where you are squeezing every drop of performance out of your system, you might be right. Nonetheless, our “Copy to Queue” is far more efficient than sending the same print job twice to RPM for processing.
How to split a text file into two separate print jobs if you have no control over the print stream
Unlike the previous scenario where you create the print stream and can mark it up any way you like, here we don't have that opportunity at all. The assumption with this type of output is that everything prints.
The trick is going to be to know where to split the file. Let’s say you know you are working with 120-page jobs. In that case, you might look for a string like “PAGE 60” although the actual value depends entirely on your print job.
In order to split a print job well, you need to understand your data very well if you plan to use the approach we outline here where we split based on content.
Your print data may be better suited to splitting by the number of pages. If so, then take a look at the logic in the next section, “How to split any other file into separate print jobs”.
If using a pattern in your print job is the right answer for you, the setup is going to be like what we used above with one exception. Don’t use a “Trim Lines” transform because you’ll want to keep each line.
Now, let’s talk about how to apply this kind of logic to other formats.
How to split any other file into separate print jobs
Earlier we mentioned that when RPM prints text, it sends to the printer all the commands needed for correct formatting. All we needed to know is when to stop printing to one printer and start printing to another.
In this section, we’re using a fundamentally different premise. Here we assume that the print job already contains the commands needed to print each page correctly, along with the print data itself. All we need is an intelligent “splitter” program that recognizes this reality for the format we’re using.
The splitter keeps track of all the commands in the file which influence output aside from the printed data. It also knows page boundaries. So, at the start of any given page, the splitter is going to know which settings are active and what their current values are.
The output of the splitter is a series of files. At the start of each file, you’re going to find the settings needed to print those pages correctly. Following this is the actual print data. The cumulative result looks identical to printing the entire document at once.
I can develop the outline of a solution here using PCL, for several reasons. First, when I developed RPM , I did it with this kind of function in mind. I wanted the user to be able to run an arbitrary script or program on a print job and so move the logic outside of RPM. This way we could do countless things far outside the scope of what we programmed into RPM itself.
Second, here at the company we have worked with commercial PCL splitters and can make a recommendation. We have recommended the PageTech PCL splitter product to a number of customers and have heard good reports about it. If you do a search for “pagetech pcl splitter” you’ll see links to that product and others. Consider that a sign of its favorable reputation.
No doubt there are other good products. I have not personally worked with them and can’t offer an opinion either way.
I’ll present two approaches. The first is for illustration purposes only. The second is closer to what I would do if it were me, without further requirements.
Oversimplified approach
- Set up a filter action in RPM. This runs a program of your choice, in the folder of your choice, with the arguments you choose. The default argument is “%s” which is the full path to the file containing the print data.
- In the script, you would run the splitter program of your choice.
- Make note of the number of files produced by the splitter program. Send the first half of these files to one printer, and the remaining files to the other printer.
- Remove the files when the printing is done.
What we have accomplished in this simple approach is to split our print job into pages, send half the pages to each printer, then finally clean up. RPM will remove files it creates but won’t touch files you create.
There are several things lacking in this approach, though. I would use this as the starting point for my logic. Here are the main points I feel are missing from the simple approach:
- Our two printers are coded into the script. This means that any time we want to do the same type of thing with different printers, we have to have a new script, almost identical to the first script
- We haven’t talked about how to send the files to the printer
- We haven’t given any consideration to whether it’s better to send all the pages in one file, or whether performance will lag if we send one page at a time
More robust approach
- Set up the script command in a Filter action, as before
- Program the script to accept the printers on the command line.
- Allow for more than two printers.
- Bonus: if you can add a weight to each printer, then you can make allowance for the fact that some printers are faster than others. Let's say Printer B was twice the speed of Printer A. You could say "A/33" and "B/67" to send more pages to B.
Advice on avoiding collisions
There are two things I would do to avoid collisions with this type of processing. Both of these bits of advice refer to configuration items in RPM.
Here are examples of what I mean by collisions. Your print job might have pages from other jobs. Or, even worse, you might delete pages before they print. If you follow my advice here, you should safeguard your processing well enough to avoid those dismal outcomes.
First, you want to make sure that no matter what happens, only one specific conversion happens at a time. RPM can do this for you, and there is an important piece of knowledge about RPM that will help you make sure this goes your way. Each filter command line counts as a “device” in RPM; that is, the entire command line with arguments, and not just the program or script. What you want to do is make sure the same exact command doesn’t run more than once at the same time.
Here is how you do that: Open the “Devices” tab in the user interface from the View menu; find the command line, and set the “Max use” value to 1. Not zero; that’s bad. Zero means you can have as many concurrent instances of this command as you like. That is not what you want.
The second thing you need to do is to make each script run in its own folder using the “Working directory” field. You should use one script that you store in one place, and customize its behavior by passing arguments like I described above. You should use a full path for the script, and set the working directory for the filter action to its own unique folder. Then you should be in good shape.
On my system, I created a “c:\output” folder, and under that I have subfolders, “1”, “2”, “3”, “4”, etc. Or name them after plants or zoo animals; it doesn’t matter. I would let each script command run in its own folder like I said above. If you do this right, there should be no leftover files.
I realize those two items may seem similar, but please do both. I programmed this feature and know how it works. Plus, the tech support staff and I talk.
Advice on sending the jobs to a printer
The world has changed dramatically since the days of connecting your PC to a printer through a Centronics-style 25 pin connector. These days Windows has a variety of ways to connect to a printer.
These are the three ways I know of to send a print job to a printer in a Windows environment:
- Use the Windows API as RPM does, full control over fonts and formatting, also you take full responsibility for the final outcome on the page. This is what RPM does with “text printing”, mentioned above.
- Use a lesser-known Windows API for sending a file directly to the printer. Few people realize that Windows uses this API itself, once it has converted your print commands into codes. RPM also uses this API for what we call “raw” or direct printing.
- Use a network protocol to send the document to the printer. RPM supports 3 such protocols used by a variety of printers, including high-end MFPs. We also make one of these available as a free client, that is, free for download and commercial use; not free for redistribution.
Unless you invest the time and energy to use #1 or #2 in a script, you’re not likely to be able to take advantage of what Windows offers. Fortunately, you can send your print files back to RPM easily enough and let RPM do the heavy lifting.
My best advice is to combine the multiple page files back into one before you send them to the printer. The reason is as follows. Let’s say you have 200 individual print jobs, which are of course individual pages of a larger print job. You would think they would always print in order, and they will almost all the time. Unfortunately, it’s impossible to absolutely guarantee the order of print jobs in a print system, particularly if they were small. You could impose delays between jobs, but that would sacrifice your throughput and in a high-demand situation, you want to avoid that.
You can save yourself a lot of manual checking of output, and grief, if you can combine the jobs into one. The vendor where you got your splitter probably has a way to merge the files correctly, as well. If you are printing text, like our first scenario many pages above, you can simply concatenate the pages into a single job.
Just make sure you merge your files in the correct order.
When to drive the printer directly from RPM versus when to do it outside RPM
We have covered several strategies for dealing with your data. In this section, we'll talk about printer connection management. Another way to put this is “how to help the printer perform well when much is expected of it.”
The bottleneck
In my experience, some printers don’t deal well with concurrent requests. If it’s in the middle of printing one job, it might or might not be able to receive your next job. It might just ignore a job here and there, or it might lock up, or worse. You would hate to find yourself manually counting jobs and pages, so let’s talk about how to avoid that.
What you want is an intermediate process that feeds jobs to the printer one at a time. And if the printer signals an error, the process will store jobs until the printer has recovered, and then resume printing. That’s the job description of a spooler. RPM fulfills this role for any device it talks with. The Windows spooler also does this for you.
My simplest advice for you is to spool through RPM since it’s already set up to do that and you don’t need to instruct it to spool. Just set the device use count to 1 as described above, and RPM will take care of the rest.
Certainly, in the real world that solution is not going to make sense to everybody. In that case, my very best advice is to get only one process to focus on sending your print jobs to a given device. If you are driving a printer from RPM, and you need very high performance, don’t also print from other processes. It’s better for one process to manage a printer than it is for two processes.
Similarly, if you are driving the printer from another process besides RPM, I suggest in these high demand situations that you focus on that.
Again, the only metric here is whether you are driving your printers constantly, versus just the occasional print job.