
We have noticed we are getting a lot more questions about our folder watcher, which we call Queue Folders. It's part of RPM Remote Print Manager® ("RPM"), specifically the Elite package. Queue Folders automatically adds files you drop into a folder to a print queue in RPM. The specific, customized processing happens in the queue.
Recently, a customer asked how to drop a file into a folder, and then have it print without any further interaction. We designed Queue Folders for precisely that kind of operation as we did for RPM itself.
How to set up Queue Folders
In an effort to help me keep everything straight, I've put all the folders I want to use with Queue Folders in a directory called "input". However, it really doesn't matter where you put your folders. The only two criteria are:
- The folders can't be used for anything else, such as another folder watcher, because all files are subject to review by Queue Folders and RPM removes the files as soon as possible
- The folders must be "local" to your computer and not shared
For no particular reason, I called my HP watch folder hp4200 but you can call it anything you want.
dir d:\input\hp4200
 Volume in drive D is Dev
 Volume Serial Number is 9E8C-C8EA

 Directory of d:\input\hp4200

08/16/2018  04:27 PM    <DIR>          .
08/16/2018  04:27 PM    <DIR>          ..
               0 File(s)              0 bytes
               2 Dir(s)  1,836,226,023,424 bytes free
Our next step is to configure RPM to print to the right printer, which in this case is my HP4200. Next, we'll point RPM at this folder.
Adding an RPM queue to print
In the user interface go to "Queue / Create"
In the example of the Create queue dialog below, notice the "Suspended" setting. Select it and turn it off.
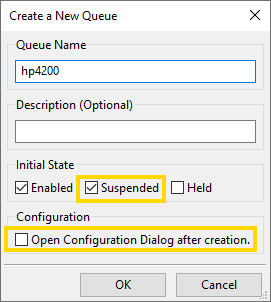
Then select "Open Configuration Dialog after creation". This provides you with the setup dialog without searching for the queue name and double-clicking.
I entered the name "hp4200" but again, you can use any name you want, so long as it doesn't exist already in your local RPM.
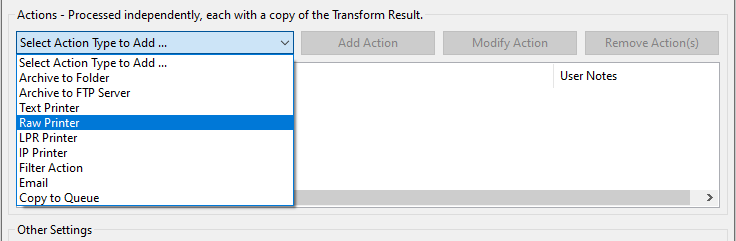
Adding the print action
An "action" is the output from a queue. We support a large number of actions, including two different actions that print to a Windows printer. One action we call "text print" because it works with plain text or formats we can translate into plain text and render it using your printer drivers. You usually have a lot of control over the layout with this method.
We also support "print-ready" files. We call this "raw print" because that's what customers call it, but it's also direct print and pass-through print. We'll use this for our example because it is easier to explain.
Click OK to create our new queue. If you have the Queue Settings form then you're ready to set up your new queue. If we are using the Raw Print action then let's not worry about transforms just now. Near the middle of the form find the droplist labeled "Select Action Type to Add ...". Select "Raw Printer" as shown below:
Click the Add Action button and you should get the Raw Printer dialog as shown here:
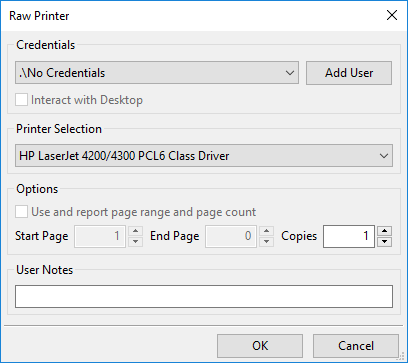
The HP4200 is the default printer on my system. If you wanted a different printer from your default, you would choose it from the droplist.
Click OK to get back to the Queue Settings form.
Configure the print action to work with the folder
At this point, I selected "Watch folder for new files". Doing this enabled the Browse button. I then selected the folder. The final result is highlighted below:
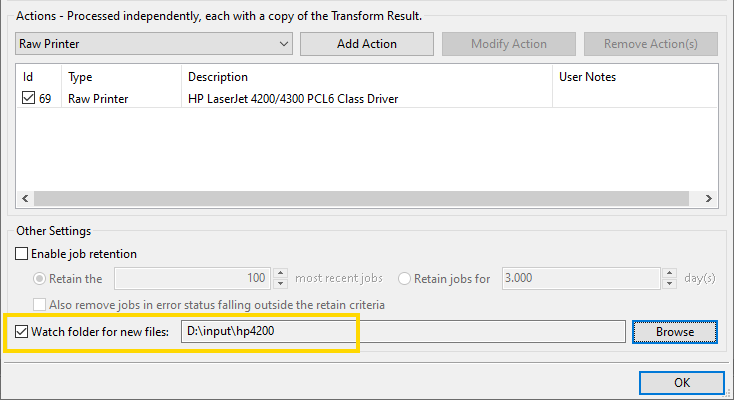
Final result
The only remaining step is to test this setup. I've already licensed Queue Folders on my machine. Please refer to Licensing Queue Folders if you need this.
I copied a couple of small PostScript files I had handy to the d:\input\hp4200 folder and both printed before I could get back to the keyboard.