Introduction
Kelly Seed in Alabama is a seed and fertilizer business. As part of their system upgrade journey of the past several years, they identified a potential improvement to their customer order fulfillment process.
Rather than print a single copy of a customer invoice on white paper and use that for every department, from accounting to delivery, they decided to use a system where each of the four departments used color stock:
- pink stock for the sale
- green for the warehouse picker
- white for signature on delivery
- yellow for the customer
This process has worked well for their situation. Kelly Seeds tells the story in their own words on our website. They worked with their IT provider, Action Computer of Dotham, Alabama, and their accounting software provider, Agvance. Kelly Seeds' accounting software prints to RPM Remote Print Manager® (RPM) as a virtual printer.
The following article describes how you can do this yourself, and you can certainly call us for assistance. By way of disclaimer, we don't know precisely how Kelly Seed configured their queues. We describe here a method that works with the RPM Elite product. With RPM Select, you'll need to use the string translate transform. We have documentation on our site already on that process.
RPM knows PCL
RPM includes a variety of internal support for PCL, plus we have developed in-house tools to understand better the PCL your system is sending.
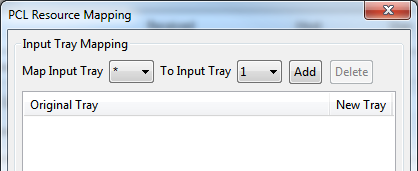
One of the tools we’ve made available in RPM is the PCL Resource Mapping transform. Let’s take a look at the tray setup:
How to determine which tray the job is using
Near the bottom of the dialog is a checkbox that reads “Log detected trays and bins.” You can find out which tray number(s) your print job specifies by using this feature.
- make sure you have created a print queue to send the jobs to; let’s call it sales
- add a PCL Resource Mapping transform to your queue
- make sure the "Log detected trays and bins" checkbox is selected
- add a Raw print action to your queue and select the printer you plan to use
The rationale for the sales queue is that’s where the originating system sends the customer invoice. RPM will handle the sales queue and, ultimately, the other three as well.
Let’s send a sample print job to our new sales queue. We’re not changing anything yet. In the RPM user interface, in the Events pane, you can see entries like the following:
Paper source arg=7
According to one PCL reference, 7 is the “Auto select” tray. The chances are that a generic print job is going to use that tray, so we’ll use that assumption to illustrate the process below.
How to choose a tray
According to one PCL reference:
- 0 = Eject Page
- 1 = Main Paper Source
- 2 = Manual Feed
- 3 = Manual Envelope Feed
- 4 = Alternate Paper Source
- 5 = Optional Large Paper Source
- 6 = Envelope Feeder
- 7 = Auto Select
- 8 = Tray 1 (right tray)
However, if you have a printer with two or more input trays, there is a chance that at least one of those trays will use a number that does not appear in this list.
If your printer has a front panel menu that lists its current settings, we recommend this as the most likely way to find the numbers for each of your input trays. If not, you’ll need to contact the manufacturer or whoever you purchased the printer from; or try a web search on that printer model.
For the sake of example, we’re going to assume trays 7, 8, 9, and 10.
The overall workflow
We have already created a queue named sales. We’ll be creating three more: warehouse, delivery, and customer. We’ll configure them in a second.
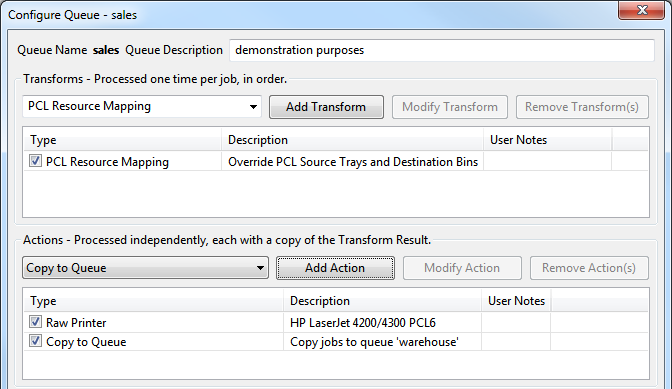
In the sales queue, make the following changes:
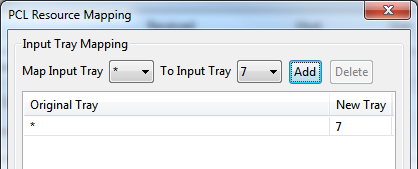
- In the PCL Resource Mapping transform, use the two drop lists to map input tray * to 7, then click Add. It should look like this:
- turn off “Log detected trays and bins”
- Add a Copy queue action and set the destination to the warehouse queue. Your queue setup should now look something like this:
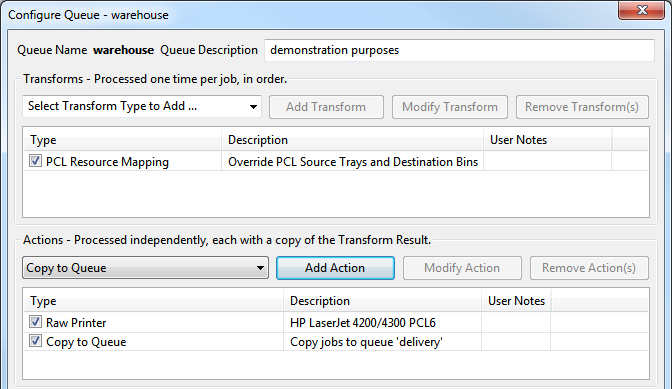
In the warehouse queue, add the following:
- Add a PCL Resource Mapping transform, and use the two drop lists to map input tray * to 8, then click Add. Note that we’re using the next input tray, which we’re assuming is 8, though it could be 14 or 27. Time and research will tell.
- Add a Raw print action and select the same printer we’ve been using
- Add a Copy queue action and select the delivery queue
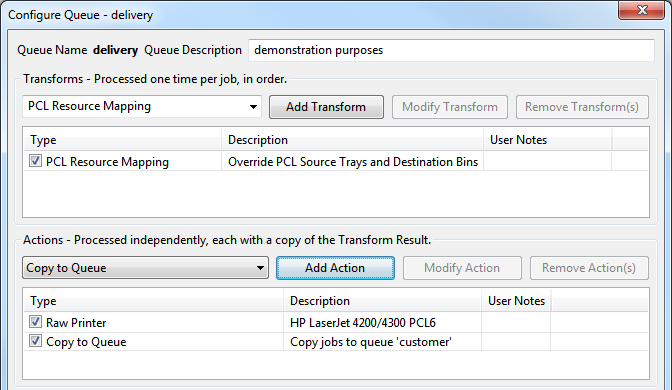
In the delivery queue, we’re going to precisely as we did in the warehouse queue, except:
- in the PCL Resource Mapping queue, we map from * to 9
- in the Copy queue action, we select customer
- note that we still add the Raw print action and use the same printer
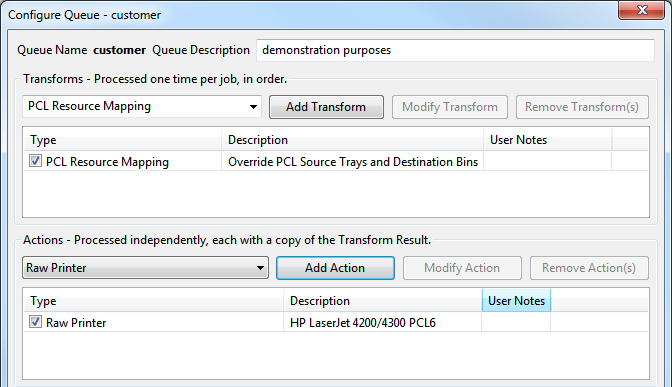
You can probably guess by now where we’re going with the customer queue. The PCL Resource Mapping transform now maps from input tray "*", denoting any tray, to tray 10. We do not add a Copy queue action as we have nowhere else to send the job. We still use the Raw print action to send our job to the printer.
Finally, make sure each of your input trays has adequate color stock. As you can imagine, at least one customer needed to check this. Send a sample print job again and watch RPM recreate the job for each color stock.
Optionally choose the output bin
If you care to, you can also modify the output bin for each of these queue definitions.
Conclusion
If we were bright marketing people, we might say that “RPM takes print workflow to a whole new level,” but… honestly, we listen to our customers and try to do what makes sense for them. Our approach to print workflow is tool-based, where we’ve been attempting to select the tools and methodology to solve the widest variety of problems as they have been presented to us since 1995.
Further search
- PCL Resource Mapping transform
- Raw print action
- Copy queue action
- String translate transform