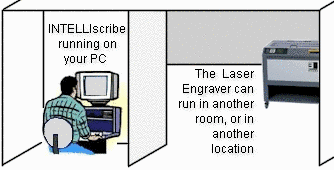
INTELLIscribe® allows Epilog® Engraver (or ANY IP-addressable device) users to work in a dust-free environment. Easily send a file from your Windows® PC to the Epilog engraver, located in another room, or another city!
 |
 Since 1988 Epilog Laser has been developing and manufacturing laser systems that feature many of the industry's "firsts". Epilog is always on the cutting edge of laser technology, creating better, stronger, longer-lasting laser systems. Since 1988 Epilog Laser has been developing and manufacturing laser systems that feature many of the industry's "firsts". Epilog is always on the cutting edge of laser technology, creating better, stronger, longer-lasting laser systems. |
All you need is an IP address and you can do the design work from home and engrave at your office. Or, you can send the same file/engraving job to different locations...at the same time. INTELLIscribe is used in conjunction with many types of laser engravers, making INTELLIscribe a flexible, easy laser engraver application!
Printing to the Legend Using the Network Connection
There are several different methods that you can use to print over the network to the Legend. This document describes how to set up the Legend to work with the network connection on your Windows PC(s).
Configuring INTELLIscribe to print to an Epilog Legend Engraver
See the quick-start instructions to begin setting up INTELLIscribe, and refer to the instructions below for specifics on configuring your Epilog Legend Engraver.
The "Queue name" parameter in the final step of the "Add Virtual Printer Port" Wizard is "Legend".
The default IP address configured in the Epilog Legend engravers is "192.168.98.1" and the subnet mask is "255.255.255.0". If you are initially configuring a network consisting of only the engraver and one other PC, then your PC's IP address should be similar, such as 192.168.98.2, but not the same. You cannot use an IP address in this class(C) with a zero (0) as the last digit. The subnet mask must be identical.
More information regarding a "time out" error.
Setting the IP Address on your Epilog Legend Laser System
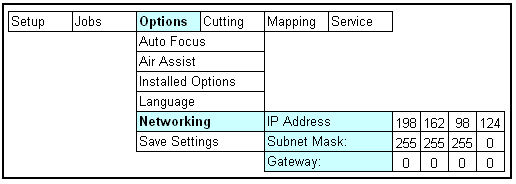
- Go to the LCD panel on the front of the machine.
- Select Options and push Enter.
- Scroll down to Networking and push Enter.
- Use the arrow buttons to navigate to the IP Address field that you want to change. Rotate the control knob on the control panel to increment or decrement each section of the IP Address until you have the number that you need.
- Once the desired IP Address has been set, press Enter.
- To permanently save the new settings, select the Options heading once again and press Enter. Scroll down to Save Settings and press Enter. Your new IP Address has been saved. If you do not save the new settings, you will lose them the next time you power down the laser.
- The Subnet Mask is factory set to 255 255 255 0 and normally does not need to be changed.
- The Gateway settings are also factory set to 0 0 0 0 and normally do not need to be changed either.