
A customer recently asked us to provide a way to specify a line and column in their print job to extract a filename. Instead, we decided to add it as a general feature to the RPM Remote Print Manager® (RPM) Elite edition. Now everyone can pull data from their print jobs to use any way they want.
Sample uses of this could include:
- Archiving your print job using an invoice number followed by the current date
- Sending an email attachment to an address embedded in the file
- Printing to a printer selected by the originating user’s ID
- Providing ideal settings for telnet print jobs (which lack that data on their own)
Data Extraction—what is it for, anyway?
You may be wondering now what “data extraction” is about. If so, here is a little background.
Simply put, RPM gets print jobs using the LPD protocol. This includes information about the job, such as the user who printed it, the job name, and things like that.
RPM has outputs for your print job, such as a printer or archiving the print job to disk. Let’s take archive. What name should you use for the file? The job name comes to mind. That’s an easy default.
Or, maybe you email this print job to someone. You might include in the subject line the job’s name and who it is originally from. RPM makes that easy for you. We have a page that talks about that process.
With data extraction, instead of using only the data that comes with the job, you can use the data in the job. Maybe you’re getting invoices printed, but they are from “SYSTEM” and you want to use the account rep. You can do that with data extraction.
Now we’ll take a look at the setup.
Step 1: setting up the data extraction transform
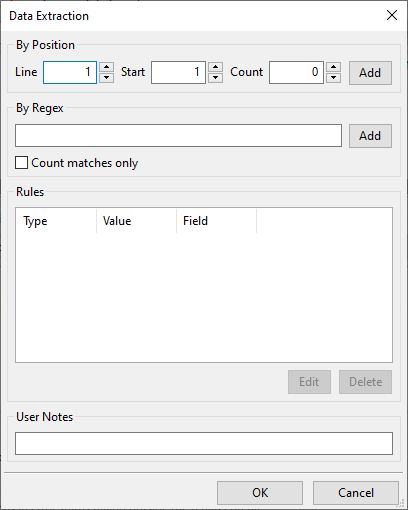
The goal of setting up the data extraction transform is to create one or more “rules”. Each rule has two important values we need to provide:
- Where in the print job do we get the data
- Which job attribute do we assign the value to
As you can see, we can extract using a position in the file, line, and column, or we can use a regular expression.
Step 2: assessing the data
We have provided a sample invoice for reference.
Let’s take a look at the first few lines of this “invoice”:
 Brooks Internet Software, Inc.
  Phone: (208) 523-6970
  Federal ID# xx-xxxxxxx
  PO Box 51446                                                Date: 3/1/2016
  Idaho Falls, ID 83405                                       Invoice No: 10547
Note that we switched the font to Courier to show the rows and columns in this data better.
Step 3: extract the data
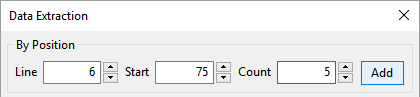
Let’s extract the invoice number, which in this file is ‘10547’. We are assuming, of course, that all our invoices have the invoice number at the same location.
We recommend you open the file in a text editor capable of displaying lines and columns. There are many popular editors. If you don’t have one, the Wikipedia has a comparison page. We like Notepad++ if you need a suggestion.
Opening the invoice file, we see that the invoice number is on line 6 and starts at column 75. There is a blank line before “Brooks Internet Software, Inc.” Entering that information into the data extraction dialog, we should end up with this:
When we click the Add button, we’ll get a drop list. Opening the list shows us these categories:
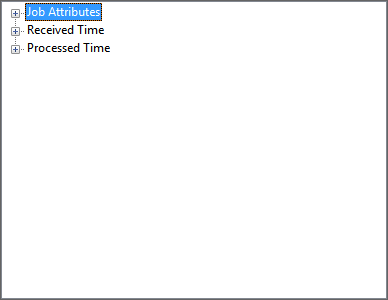
Click on the “+” next to “Job Attributes”.
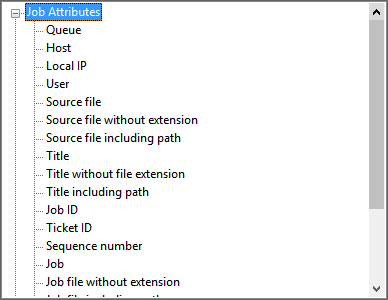
We will click “Job” near the bottom of this list. Then click on the “OK” button and we should see our first rule:
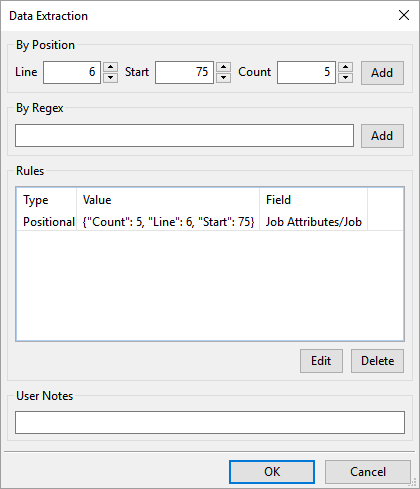
This transform expects you to enter all the rules at once, rather than making a new transform for each rule.
When you print jobs to this queue, RPM will extract line 6, column 75 for 5 characters, and put that data into the “Job” attribute. You can then use this value in any action you choose. For instance, if you convert this data to PDF, in the Archive action you could specify “Job” and add “.PDF”. This way you will create PDF documents with the invoice number.