The purpose of this document is to assist you in configuring your computer running Windows 2000 or later to print through RPM. It is intended for network and systems administrators. For these instructions, you need to know the IP address or DNS hostname of the computer on which RPM is installed.
Creating a Queue in RPM
- In RPM, choose Create from the Queue menu.
- Enter the name of the new queue you wish to add and click Create. The new queue will be created.
- Highlight the queue and choose Settings from the Queue menu. Add the action(s) necessary to produce your desired results. For instance, if you want to archive the file to disk, add Archive to disk. If you want to print the documents, choose a Raw printer action.
- Now add any transforms you require. Windows applications send complex print data, which can limit the number of useful transforms. Using transforms such as converting to PDF or removing PCL codes may not produce desirable results.
Note: These instructions are intended to provide only a brief introduction to RPM configuration. For more detailed instructions, refer to the RPM manual.
AS/400 Setup for V4R4 (version 4.4) and Later
- We recommend you perform a telnet test to verify your computer can connect to RPM. To do so, type the following at a command prompt (cmd.exe): telnet
515. Substitute the IP address or hostname of your RPM host where appropriate. - In the Windows Printers folder, select Add Printer. Review the Add Printer Wizard's introduction page and click Next.
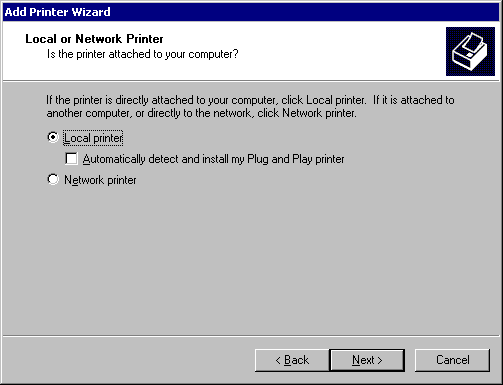
- In the first step, choose "Local printer", then deselect "Automatically detect and install my Plug and Play printer."

- When prompted, select Create a new port, highlight Standard TCP/IP Port, and click next. The Add Standard TCP/IP Printer Port Wizard will begin. Click Next on the Introduction page.
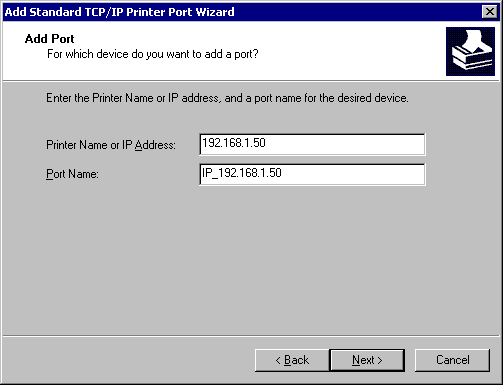
- Enter the RPM host's IP address in the Printer Name or IP Address field. Either accept the default Port Name or enter a new name and click Next.
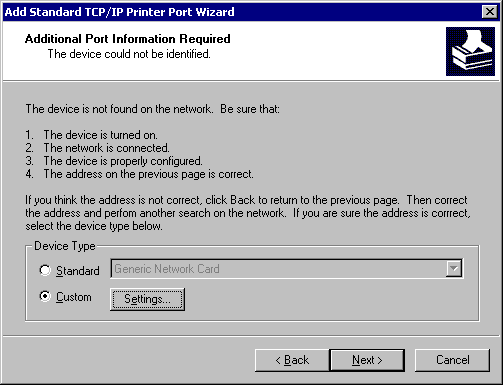
- Windows will attempt to configure the port using SNMP. Because RPM does not support SNMP, the wizard will tell you that additional port information is required. Choose Custom and click Settings.
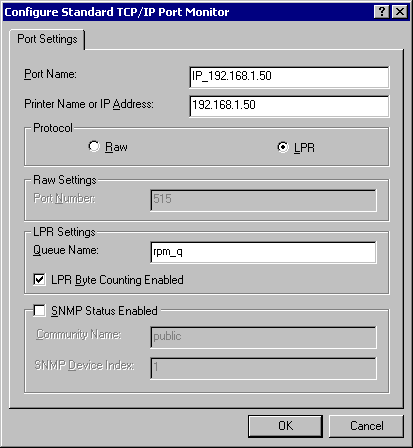
- Select the LPR protocol, and enter the RPM queue name in the parameter. LPR byte counting is optional, but SNMP status should not be enabled. Click OK when finished. Click Next, then Finish to complete the Add Standard TCP/IP Printer Port wizard.
- Complete the Add Print Wizard by selecting the correct printer software. You might also use the Generic/Text Only print driver in certain situations.
You can also download a PDF Version of these instructions.