
Portals
Transforms
Actions
PDF
Print to
Windows printing
Text markup
Queues
How to
Workflow
Archive
Email
Purpose
Text markup is the vehicle we have created within RPM Remote Print Manager® ("RPM") to contain all your text print setup for each print job. It includes line metrics, font information, and any special markup in the print job itself including overstrike and bold.
Text markup has been part of RPM since the beginning. The earliest version of text markup simply copied the settings from the Text Setup dialog. If you're not familiar with RPM version 4.5 and prior, we're talking about margins, lines per inch, characters per line, font name, that sort of thing.
When we added SCS support to RPM we extended text markup to include all the features needed to print SCS properly.
In RPM the text markup has all the features we need to support SCS and several input text formats.
Consistent results
The most important advantage of text markup, we feel, is that you get consistent results whether you are printing to a Windows printer, generating PDF, or converting to PCL or HTML. Once you discover the settings that work best, you can reproduce those results simply.
Unicode support
Text markup is designed to support Unicode. When you look at the setup descriptions, you'll notice an input code page or data format for each one. Internally RPM will translate the data into UTF-8 from the format you choose.
The outputs then assume they are getting Unicode data and process accordingly. This is particularly valuable for text printing and printing to PDF, where both use Unicode to generate output for any language assuming you select the right font.
Inputs
Plain text
Plain text can include ASCII (Latin1) or anything that RPM can easily translate to text, including EBCDIC and code pages such as Traditional Chinese
SCS
SCS is an EBCDIC-based markup format. It can include line width and height but does not necessarily. This is why the SCS transform includes those settings. The SCS print job will override but at least you can specify the minimum results you want.
ASA
ASA is a text-based markup format that is one of the first to be used in digital printing.
COR
COR both reads and writes text markup.
Outputs
Once you have converted your print job to text markup, these are the things you can do next:
- Windows printing through the text print action
- Output to PDF, commonly archived or emailed
- Convert to PCL, typically printed or fed to a document management system
- Convert to HTML or plain text, commonly archived or emailed
Layout control
Within text markup, you have control over page layout and font sizing, both width and height.
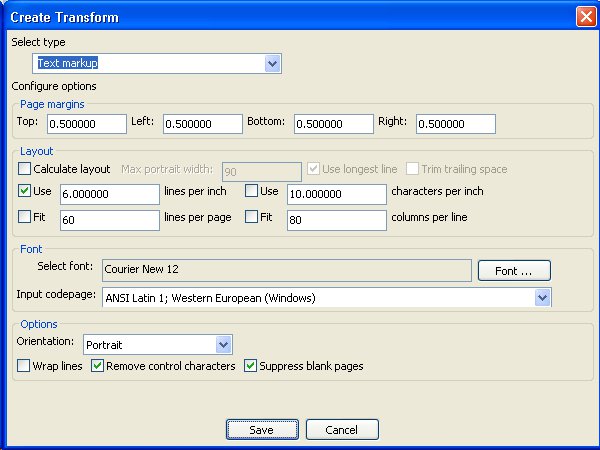
Let's take a look at the controls in the text markup dialog, which appears to the right. After you set the margins, in units of inches, you have the layout functions.
Calculate layout
We added, "Calculate layout" or "auto-calc" to RPM in version 5.0 to convert plain text that had been sent to the text print action or the PDF transform. To give the user the best shot at a decent printout, we decided to try to analyze the data, rather than go for default lines per-inch setting.
Check the "Calculate layout" box to enable this function and the settings that go with it. Note that you can use "Calculate layout", or line and column settings, but not both. When you use this function, RPM reads through the data looking at line lengths and number of lines per page, assuming it finds form feeds. After looking at up to 64K bytes of data, RPM will determine the line and column settings that fit the data.
Please note:
- If RPM determines the lines are longer than "max portrait width" it will force the output to landscape
- RPM will either use the longest line length or a weighted average of the line lengths
- RPM can optionally trim whitespace from the ends of the lines before making the length determination
Use and Fit settings
By default RPM expects the user to set the page sizes that work for you.
- You can use lines per inch, lines per page, or neither but not both
- You can use characters per inch or characters per line, or either but not both
If you use lines per page or columns per page, then RPM determines the actual lines per inch or columns per inch from the page size when you output. This is described below.
COR
COR was intended to match a similarly named setting on the iSeries that set lines per page, columns per inch and portrait vs. landscape based on the text in the printed page. The RPM COR transform reads text markup, strips out the line and column settings, and substitutes new ones based on the actual content.
Text metrics
We mentioned earlier that RPM prioritizes line widths and page length, or columns per line and lines per page. That's why 6 lines per inch is turned on by default.
- What happens when you set lines per inch
- RPM calculates the line spacing as (72 / lines per inch). For 6 LPI the line spacing would be 12.
- RPM factors in some white space between the lines and reduces the font size down just a bit
That's why, in our example, changing the font size in the dialog had no effect. RPM was going to change it anyway based on the lines per inch.
- What happens when you set characters per inch
- RPM creates a font with that width. However, Windows doesn't usually allow us to create a font with zero height, so we again use a factor based on experience and information from the Windows font data to come up with a font height. Usually, the width is about 60% of the height.
- RPM then calculates a line spacing that allows for a little white space. Since you didn't ask for a font height, we figured that whatever looks good is all right.
- What happens when you set both lines per inch and characters per inch
This is actually slightly easier.
- We calculate the line spacing and set the font height as with lines per inch.
- We set the font width but don't need the Windows font data this time.
- What happens when we set lines per page
- RPM looks at the page size we're working with
- Take the total height, subtract the top and bottom margins, leaving the print area height in inches
- Divide that by the number of lines, leaving lines per inch
- Calculate lines per inch as above
- What happens when we set characters per line
- Given what we do above, this is what you would expect: take the page width, subtract the left and right margins, divide what remains by the number of characters per line
- Set the characters per line as above
Every other combination works as you would expect:
- lines per page and characters per line
- lines per page and characters per inch
- lines per inch and characters per line
- etc.